Taking ID photos at night isn’t exactly a walk in the park. The biggest challenge? Getting the lighting right. Without good lighting, you risk shadows, grainy images, or worse — photos that simply won’t pass the strict requirements for official ID use. But don’t worry! I’m here to break down the best lighting setup for snapping those perfect ID shots after dark, step by step. Let’s dive in.
Why Lighting Matters for Nighttime ID Photos
You might be thinking, “Isn’t any light good enough?” Actually, no — when it comes to taking ID photos, especially at night, lighting isn’t just important; it’s everything. In daylight, you can often get away with using natural sunlight to highlight your face evenly, but at night, you’re left with artificial sources, which can either help or completely ruin your photo. Poor lighting leads to images that are blurry, grainy, or full of harsh shadows — all things that are a big red flag when it comes to official ID requirements.
One of the main reasons lighting is so crucial is clarity. ID photos must show your facial features in high detail — every contour, every line, clearly and sharply. Dim or uneven lighting can obscure parts of your face or introduce visual noise that makes the image unusable. This becomes even more of an issue if your camera struggles in low-light conditions, which can lead to soft focus, ghosting, or overexposed highlights that wipe out your natural features.
Even lighting is another factor that plays a vital role. When you don’t light your face evenly, shadows creep in under your eyes, around your nose, and under your chin, distorting how your face actually looks. This isn’t just about looking good — it’s about creating a neutral, consistent image that can be easily recognized and verified. Shadows also cause complications for biometric systems that rely on facial symmetry and clear, unobstructed features to function correctly.
Finally, color accuracy and compliance come into play. Different light sources have different color temperatures, which can cast an unnatural hue on your skin or background. A yellow or bluish tint might not seem like a big deal at first glance, but official agencies often reject photos where the skin tone doesn’t appear natural or where the background color isn’t consistent. In short, bad lighting can mean wasted time, extra costs, and denied applications. If you want your ID photo to pass inspection, especially when you’re shooting at night, getting the lighting right isn’t optional — it’s essential.
Challenges of Taking ID Photos at Night
| Challenge | Description | Why It Happens | Effect on Photo | What You’ll Notice |
| Limited Natural Light | Lack of sunlight forces reliance on artificial light sources | Sun has set, no ambient daylight available | Dull, uneven lighting; poor facial visibility | Flat or dim images with loss of detail |
| Harsh Shadows | Strong light sources cast sharp, unflattering shadows | Artificial lights often positioned poorly or too harsh | Distorted facial features; dark patches on the face or background | Chin, nose, or neck shadows that ruin the image |
| Color Temperature Issues | Bulbs emit various color tones that affect skin and background appearance | Inconsistent bulb types (warm, cool, LED, incandescent) | Unnatural skin tones; mismatched background colors | Yellow, orange, or blue tints across the photo |
| Camera Limitations | Low light forces the camera to compensate, often poorly | Most consumer cameras struggle in poor lighting | Blurry, noisy, or pixelated images; loss of sharpness | Grainy quality, soft focus, or movement blur |
| Inconsistent Exposure | Improper lighting setup creates uneven exposure across the image | Lights may be too close, too far, or off-angle | Overexposed spots or underexposed shadows | Bright forehead with dark cheeks or uneven skin tone |
Key Principles for Nighttime ID Photo Lighting
So what should you keep in mind when setting up lights for your nighttime ID photos? Getting great lighting at night is all about balancing brightness, softness, and color accuracy to ensure your photo is clean, professional, and meets all official requirements. Unlike daytime shoots, you can’t rely on natural light — so your setup needs to be intentional and controlled. Here’s a detailed list of essential principles that will help you create an ideal lighting environment when the sun’s down.
- Use Even, Soft Lighting Across the Face
Harsh lighting can ruin an ID photo by casting deep shadows and creating unflattering contrasts on your face. That’s why soft, diffused light is your best friend for nighttime photography. The goal is to mimic the smooth, consistent quality of daylight by using tools like softboxes, diffusers, or bounced light. Soft lighting wraps gently around your features, minimizing shadows under the eyes, nose, and chin, and giving the image a polished, professional appearance. - Make Sure Your Light Source Is Front-Facing
One of the golden rules for ID photography is to light the subject from the front. This helps illuminate both sides of your face equally and brings out your natural features without distortion. Lights that are placed too far to the side will introduce uneven highlights and shadows, making your face appear asymmetrical. Whether you’re using a softbox or a ring light, position it directly in front of you, ideally just above eye level and angled slightly downward. - Stick to a Neutral Color Temperature
Lighting color has a major impact on how your skin tone and background appear in the final photo. For ID images, a neutral daylight color temperature — around 5000K to 5500K — is ideal. This type of light closely resembles natural sunlight, which keeps skin tones accurate and prevents strange color casts on the background. Avoid using warm bulbs (which give off yellow/orange light) or overly cool LED lights (which can create a blue tint), as these can cause your photo to be rejected by official agencies. - Minimize Background Shadows at All Costs
One of the most common ID photo mistakes is letting shadows fall on the background. These shadows can make your photo look amateurish or even cause it to fail compliance checks. To prevent this, create a little distance between yourself and the background (at least 3 feet if possible) and angle your lights so they don’t cast your silhouette behind you. Using a dedicated light aimed at the background can also help eliminate unwanted shadows and create a clean, flat backdrop. - Avoid Mixed Lighting Sources
Mixing different types of lights — for example, a warm incandescent bulb and a cool LED panel — can lead to inconsistent lighting that looks strange in photos. It can cause color shifting where one side of your face looks warmer than the other. Stick to lighting tools that all share the same color temperature and lighting quality for a balanced image. - Control Brightness to Prevent Overexposure
Too much brightness can blow out your facial features, especially around the forehead and cheeks, making the photo unusable. Make sure your lights are dimmable or placed at the right distance to avoid overexposing the image. It’s always easier to brighten a photo slightly in post-processing than to fix blown-out highlights.
The Best Lighting Setup for Nighttime ID Photos
Let’s get practical. Taking an ID photo at night may seem intimidating at first, especially if you don’t have access to professional studio equipment. But the truth is, with just a few well-placed lights and a bit of preparation, you can create a lighting setup at home that rivals commercial photo booths. The key lies in using consistent, soft, and neutral lighting that mimics daylight — ensuring your face is clearly visible, evenly lit, and free of distracting shadows or color casts. Whether you’re using softbox lights, desk lamps, or DIY diffusers, the goal remains the same: produce a clean, professional-looking photo that meets ID requirements.
The foundation of any good lighting setup for ID photos starts with your main light. This should be your brightest source and positioned directly in front of you at about eye level or slightly higher. If you’re using a softbox, ring light, or even a DIY setup with a white lampshade, make sure the light is diffused to avoid casting harsh shadows. This main light serves to illuminate your entire face evenly, highlighting features without exaggerating any lines or imperfections. Keeping it centered prevents one side of the face from appearing darker than the other, which is a common issue in poorly lit photos.
To support your main light, you’ll want to use a fill light placed at about a 45-degree angle from your face. This secondary light should be softer and slightly dimmer than the main source, helping to reduce any residual shadows, particularly around your eyes and jawline. If you don’t have a second light, you can improvise by using a white board, reflective surface, or even a piece of aluminum foil to bounce some of the light back onto your face. The goal here is subtle balance, not brightness — just enough to eliminate hard contrasts without flattening your features.
Lighting the background is often overlooked but crucial for a professional finish. If you stand too close to the wall, you’ll likely cast a distracting shadow behind you. To avoid this, step at least three feet away from your backdrop and, if possible, use a small light directed toward the wall to keep it bright and evenly lit. This background light should be low in intensity — just enough to separate you from the wall without drawing attention. The result? A clean, distraction-free image that emphasizes your face and meets official ID photo standards, even if it was taken well after sunset.
Equipment You’ll Need
| Equipment | Purpose | How It Helps | Extra Tips | Recommended? |
| Two Softbox Lights | Provide soft, diffused, even lighting | Reduce harsh shadows, evenly illuminate the face and background | Place one as a key light and the other as a fill at 45° angles | Absolutely essential |
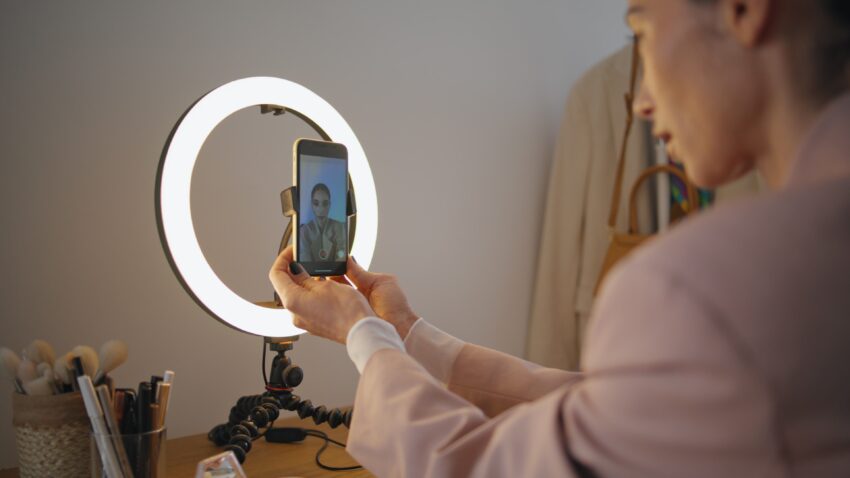
| Ring Light | Balanced frontal lighting, minimizes facial shadows | Adds catchlight to eyes, fills in central shadows | Mount around camera for symmetry; dim to prevent overexposure | Optional but highly useful |
| White or Neutral Background | Ensures a clean, uniform, and professional look | Prevents distractions, helps with photo approval standards | Use a wrinkle-free sheet or backdrop stand | Strongly recommended |
| Tripod for Camera | Stabilizes camera for sharper images in low light | Prevents motion blur from handholding during longer exposures | Use with timer or remote shutter to avoid camera shake | Must-have for consistency |
| LED Bulbs (Daylight 5500K) | Provide neutral color temperature for accurate skin tone | Keeps colors balanced and realistic — critical for ID compliance | Use in all lights to avoid mixed color temperatures | Crucial for photo accuracy |
| Light Diffuser or Reflector | Softens light or redirects it to fill shadows | Balances exposure, adds softness to one side of the face | Can be improvised with white cardboard or aluminum foil | Great low-cost lighting aid |
| Smartphone with Manual Mode | Acts as a camera with adjustable exposure and focus | Allows control over brightness, white balance, and focus | Use a camera app that supports manual settings | Sufficient for most users |
| Clamp Lights or Desk Lamps | Alternative lighting if softboxes aren’t available | Still provides directional lighting if positioned correctly | Use with white cloth to diffuse light | Budget-friendly substitute |
| Backdrop Stand or Tape | Holds background securely in place | Keeps your scene clean, tidy, and free from folds or movement | Avoid bright or reflective surfaces behind you | Optional but helpful |
| Power Strip with Switches | Centralized power control for all lights | Lets you quickly adjust or shut off individual lights | Organize cords to avoid tangles during setup | Adds convenience and control |
Step-by-Step Lighting Setup
Setting up lighting for ID photos at night might feel like assembling a mini photo studio — but it’s actually a lot simpler than it sounds. With just a few pieces of gear and the right placement, you can create a lighting environment that makes you look clear, evenly lit, and completely photo-ready. Here’s a detailed step-by-step guide to help you build that perfect setup from scratch.
- Position Your Main Light Properly
Start by setting up your main softbox or key light directly in front of you. It should be placed at about eye level or just slightly higher, around 3 to 4 feet away from your face. This is the primary source of light that will illuminate your facial features and eliminate most of the shadows. The goal is to create soft, even lighting that flatters your face and keeps everything clear for identification purposes. If your light is too high, too low, or off to the side, it will create shadows that distort your appearance. For the best result, tilt the light slightly downward so it shines gently across your face — this helps avoid glare on the skin or reflective surfaces like glasses. - Add a Secondary Fill Light at an Angle
Now it’s time to bring in your second light — the fill light. This light’s job is to soften any shadows that your main light creates, particularly around your nose, chin, and eyes. Set it up on the opposite side of your main light, roughly at a 45-degree angle to your face. It should be just slightly lower in brightness than the key light to avoid overpowering it. The idea is balance — you want both sides of your face to be visible, but not flat or washed out. If you don’t have a second softbox, you can use a lamp with a daylight bulb or even bounce light off a white surface like a wall or reflector to mimic the same effect. Properly adjusting the fill light is what gives your photo that smooth, studio-finish look, even if you’re shooting in your bedroom at night. - Use a Ring Light for Balanced Front Illumination (Optional)
If you have access to a ring light, this can be a game-changer for achieving truly even lighting across your face. Ring lights are especially popular for portraits and headshots because they wrap light around the entire face, minimizing shadows and creating a soft, almost glowing effect. Set it up directly in front of you, with your camera lens in the center of the ring. This will ensure the light is evenly distributed, eliminating any lingering dark spots and adding that signature catchlight in the eyes — a small detail that makes your face look more vibrant and alive in the photo. While not mandatory, a ring light is a helpful addition if you’re looking to replicate a professional lighting setup with minimal gear. - Double-Check Your Setup and Make Small Adjustments
Once your main, fill, and optional ring lights are in place, take a few test shots to see how your lighting looks in practice. Look for areas where shadows still appear — under your eyes, around your jawline, or behind you on the background. Adjust the angles, heights, or brightness levels of each light as needed. Sometimes moving a light just a few inches can make a huge difference. It’s also a good idea to check how the lighting appears on camera versus what it looks like to the naked eye, as cameras often exaggerate shadows and highlights. Your final aim should be a crisp, well-lit image where your facial features are evenly highlighted, skin tone looks natural, and the background is clean and shadow-free. When it all clicks, you’ll know — the lighting just feels right.